This tutorial aims to detail the setup of the technical system used in the Digital Urbanities in Games (UNEJ) project. It explains step-by-step how to install and configure a server, add the elements necessary for its proper functioning, and manage permissions to organize a collaborative space adapted to the needs of students and teachers. Whether you are a novice or experienced user, this guide will help you deploy an environment suited to educational uses and exploration of the game territory.
1. Generating and Installing the IGN Map
1.1 Generating the Map
First of all, you must choose a map to work with by generating it on the IGN service: Minecraft à la carte.
1.2 Map Installation
Once the map is generated, it will be received by email as a ZIP file. To install it in Luanti:
- Unzip the file into the
worldsfolder at the root of Luanti. If theworldsfolder doesn’t exist, you must create it. - Rename the folder if necessary. Example:
map_seine_saint_denis - Inside the map folder, create a
worldmodssubfolder in which you can place all your mods (explanation later in this tutorial).
!! Caution!! This only works for a local game or a basic server. If you are using Minetest Lab services, follow the instructions given in 2.1.
2. Server Installation and Configuration
It should be noted that installing a server, regardless of the method, requires some computer skills. If this isn’t possible, you can always install Luanti on your own computer and use it as a local server. 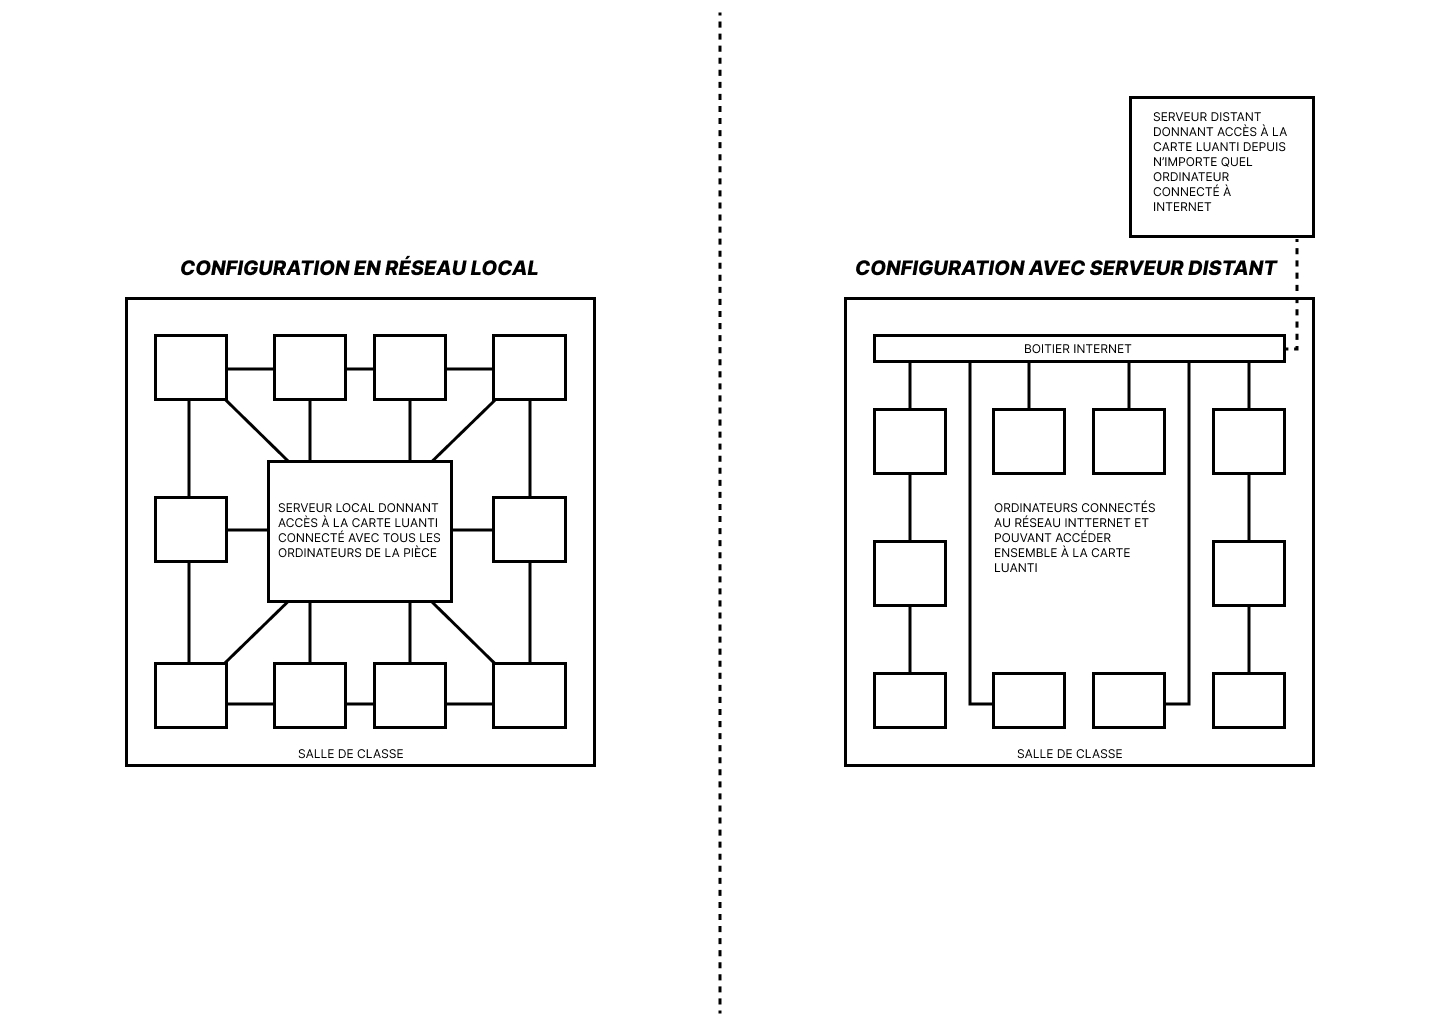
To launch a local game as easily as possible, you need to download the Luanti client that corresponds to your operating system, then follow these steps:
- Drop the map into the
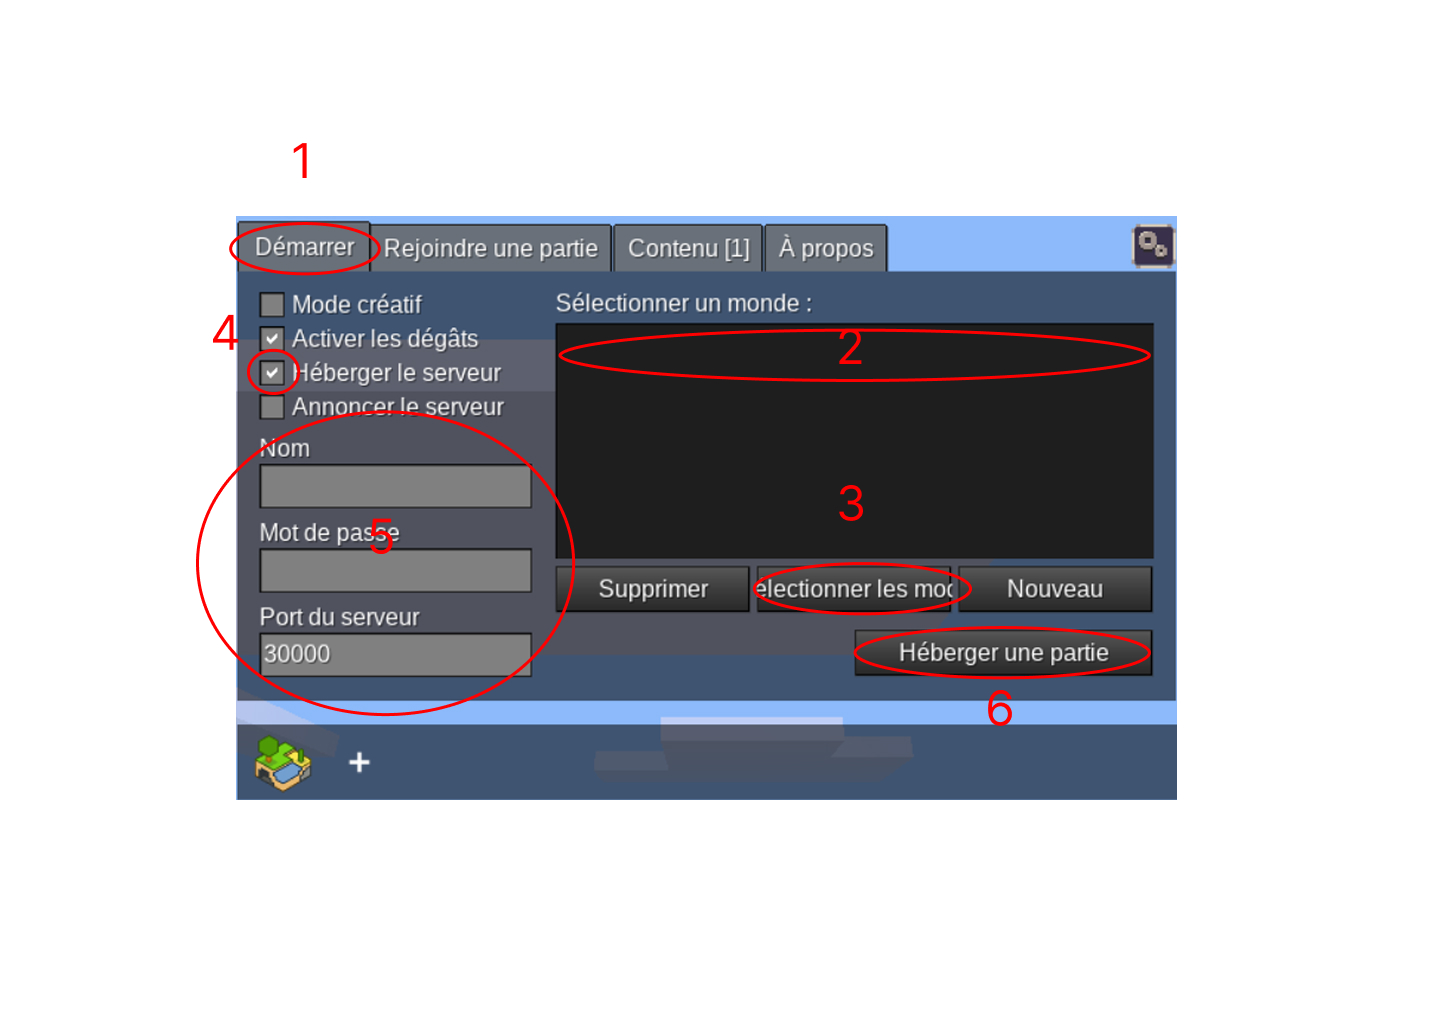
worldsfolder of the downloaded Luanti folder. - Launch the Luanti client and click
Start. - Select your mods manually.
- Enable creative mode and server hosting.
- Enter an administrator name and password.
- Click
Host a Game.
Anyone connected to the same internet network as you can join your game by clicking Join a Game and then entering your [address]. IPV4](https://www.mon-ip.com/) as the server address
2.1 Installing MinetestLab Services (Upcoming Changes)
As part of UNEJ, the IRI has combined several services offered by the Luanti community to enable the implementation of a server focused on educational activities and student management. All these tools have been combined into a server called MinetestLab (MTL)
The MTL server is based on a Docker image, facilitating its deployment and management. This image contains all the elements necessary to run a preconfigured Minetest/Luanti server. You can download and use this image by accessing the following repository:
This folder contains the definition of the MTL server home page. This page uses Hugo, a static website generator.
The page is built in the Dockerfile, which is called by the docker-compose.yaml project located in the parent folder.
If you have the necessary development skills, the website can be easily built locally or using a container (see the original repository for details).
Download the Docker Image
Prerequisites
- Docker + Docker Compose (or Podman)
- An empty folder where all data and configurations will be stored. By default, the project uses a
./datafolder located at the same level as thedocker-compose.ymlfile. - Bash
- jq
- sudo
- GNU grep
- GNU Make
Prepare your name resolver to resolve the server’s domain name. For example, for a local deployment using the default domain, add the following entry to your /etc/hosts file (see How to Edit the Hosts File on Windows, macOS, and Linux):
/etc/hosts
127.0.0.1 mtl-server.test
Commands
The project uses a set of commands implemented as GNU Make targets.
All commands must be executed in the folder containing the docker-compose.yml and Makefile files.
The list of available commands and their descriptions is displayed with the make or make help commands.
Starting a Server
- If necessary, create the
.env-systemfile from its.env-system.tmpltemplate and adapt its contents to your needs. - Start the server with the command:
make cold_start
Importing an IGN Map
- Download the ZIP file containing the map.
- If necessary, create the
.env-systemfile from its.env-system.tmpltemplate and adapt its contents to your needs. 3) Start the server with the command:make cold_start - Open your browser and navigate to the
filebrowserapplication: https://mtl-server.test/fb/ (with default values). - Upload the map ZIP file to the
import_mapfolder (you can only have one file, and it will be deleted after importing). - Run the following command:
make import_mapThe map will replace the old one. Warning: the old map will be deleted. Remember to back it up if necessary. 7) Start the server with the command:make start
2.2 The Luanti Minetest Lab Server (Upcoming Changes)
Aside from the import_map folder, the Luanti tree in the filebrowser application consists of several important folders:
world: Contains the previously installed IGN map.world/worldmods: Contains map-specific mods that you can add directly according to your needs.conf/minetest.conf: Server configuration file to complete (example here)
2.3 Mods
*In Luanti, a “mod” is a modification that adds new elements, features, or behaviors to the game. This can include blocks, objects, textures, mechanics, or even gameplay modifications. These mods are written primarily in Lua, a lightweight programming language, and can be shared or downloaded via the official platform (https://content.luanti.org/) or community forums.
Mods in Luanti allow you to customize and expand the voxel world, offering a variety of options ranging from simple changes, such as adding a new material type, to more complex additions, such as entirely new game mechanics (e.g., life support systems, player interactions, or even server management tools).
During the UNEJ workshops, we chose a collection of mods called Edu Mods, which can be viewed on the official platform: https://content.luanti.org/collections/IRI/edu_mods/
The following mods are installed directly into the mtl game and are essential for minimal server administration:
- areas
- default
- server_news
- mapserver_mod
- maptools
- monitoring
- playerfactions
- playerfactions_ext
- we_undo
- whitelist
- worldedit
- worldedit_bigschems
Furthermore, we recommend using the specific mods from the Edu Mods collection, but if you feel up to it, feel free to explore all of them. Community mods.
Once a mod is downloaded, for it to work in your world, you must place it in your world’s “worldmods” folder.
3. Connecting to the Server
3.1 Using the Client
Two options are possible:
- Web Client: Luanti Web Client (“Public Servers” tab).
This client allows you to play Luanti without having to download anything. Despite some slowdowns, you can avoid network and/or security issues related to the hardware you use. However, you will not be able to save your client’s configurations, such as customizing your keyboard keys or graphics settings.
- Native Client: Download the Luanti Client.
This client is the most stable and allows you to access the entire Luanti tree locally and save your configurations. You will, however, need to ensure that the network infrastructure of the location where you are conducting your workshops allows you to connect to a remote server without any restrictions.
3.2 Connection
- Open the Luanti client and click ‘Join a Game’.
- Enter the server address and port.
- Enter a username and password.
4. Group Management and Permissions
As part of your workshops, you will need to manage groups of students (or other types of players) and moderate their actions based on what you want them to build or visit. Here are the commands you need to maintain maximum control over your group of students. As an example, we’ll take a group of students from Poincaré Middle School, with a student with the username RiwadS and a teacher with the username MisterB.
Reminder: to run a command, you must open the chat by pressing the T key. All commands begin with / except worldedit commands, which begin with //. To run a command, you must ensure you have the corresponding privilege. To view your privileges, run the command /privs MisterB
To view all available commands: /help
4.1 Group Management
As part of the UNEJ project, we used the playerfactions and developed a mod adding additional features
In video games, a faction generally refers to a group of players united around a common goal, often with competitive or combat mechanics. However, for the purposes of this tutorial, factions are used solely as a group management system. They allow you to organize players without any notion of rivalry, as the game is in creative mode.
Here, we’ll take the example of a group named 6e_Poincaré with the group password UNEJ93.
- Create a group:
/factions create 6e_Poincaré UNEJ93 - Add a player:
/factions invite RiwadS 6e_Poincaré - Join a group:
/factions join 6e_Poincaré UNEJ93 - Change the password:
/factions passwd New_UNEJ93 6e_Poincaré - Remove a player:
/factions kick RiwadS - View the list of groups:
/factions list - Group information:
/factions info 6e_Poincaré
4.2 Zone Management
Zone management is done with the areas mod
- Define the area corners
/area_pos setthen click on the two corners to protect./area_pos1or/area_pos2to set a corner at your current position./area_pos1 X Y Zor/area_pos2 X Y Zto set a corner at the specified coordinates.
- Protect an area
/protect <AreaName>→ Protect an area for yourself (if self-protection is enabled)./set_owner <Player> <AreaName>→ Protect an area for a specific player (requires theareasprivilege).
- Manage Access Rights
/add_owner <ZoneID> <Player> <SubZoneName>→ Grant a player control of a sub-area./area_open <ZoneID>→ Open/close the area to everyone./area_faction_open <ZoneID> <Faction>→ Open/close the area to members of a faction.
- Other Useful Commands
/list_areas→ List the areas you own./rename_area <ZoneID> <NewName>→ Rename an area./remove_area <ZoneID>→ Delete an area (sub-areas remain accessible). -/area_info→ View area information./select_area <ZoneID>→ Select an existing area to edit.4.3 Privilege Management
Privileges are permissions that determine what a player can do on a server. For example, some privs allow players to fly, build and interact, or give items.
Server administrators can grant or revoke these privileges to players with commands like:
/grant <Player> <priv> → Add a privilege
/revoke <Player> <priv> → Revoke a privilege
/privs <Player> → View a player’s privileges
These permissions allow you to control the gaming experience and ensure the server runs smoothly. With the playerfactions_ext mod, which extends the functionality of the playerfaction mod, it is possible to use the /grant and /revoke commands on an entire group.
For example, the command /revoke 6e_Poincaré fly revokes the fly privilege from all members of the 6e_Poincaré group.
Some additional examples of privileges:
- Basic Privileges
interact: Build and mineshout: Speak in chatfly: Flyfast: Move quicklynoclip: Walk through blocks
- Moderation Privileges
privs: Grant or revoke privileges with the/grantand/revokecommands./revokeban: Ban a playerkick: Temporarily kick a playerteleport: Use the/teleport PlayerOrGroup Player2command to teleport a player or group to another playergive: Use the/give PlayerOrGroup Item:Numbercommand to give items to a player or group
- Advanced Privileges
areas: Manage area protectionsplayerfactions_admin: Manage and control all groups on the serverworldedit: Use world manipulation commands beginning with//
To see all available privileges, type the command /help privs`
5. Blocks
Blocks (called nodes) are the basic building blocks in Luanti. There are many of them (in addition to objects called items), and new ones can be created by external contributors. Therefore, this is not intended to be an exhaustive list of the game’s blocks (which is impossible). As part of the workshops, we attempted to categorize the materials to correspond to real-life materials:
5.1 Construction
- Stone:
Stone (grey),Sandstone (White, Beige) - Brick:
Brick block (Red) - Wood:
Wood (4 colors)
5.2 Outdoor Spaces
- Plastic Flooring:
Wool (several colors) - Furniture:
Fence (all colors),Chair (all colors)
5.3 Natural Elements
- Trees:
Tree (all occurrences) - Grasses:
Dirt with Grass
5.4 Energy
- Wind Turbine:
Windmill - Electrical Energy: Mesecons
You can of course create your own repository.
Very good workshops and don’t hesitate to contact us for more information!